Complete Wheelchair Usage Guide
TABLE OF CONTENTS
Wheelchair Seasonal Weather Safety Tips
- Winter
- Spring
- Summer
- Fall
Wheelchair Sports Tips
- Basketball
- Racing
- Rugby
- Tennis
- Sled Hockey
Wheelchair Accessible Activities
- Wheelchair Accessible Trails
- Wheelchair Accessible Concerts
- Accessible Surfing
Wheelchair Accessible Homes
- Accessible Kitchens
- Flooring for Wheelchairs
- House Hunting
Wheelchair Travel Tips
- Accessible Air Travel
- Booking an Accessible Cruises
- Road Tripping
- Amtrak/Train
Wheelchair Safety & Maintenance Tips
- Time for a New Wheelchair?
- Being a Good DME Consumer
- Preventing Pressure Ulcers
Wheelchair Prom Prep Tips
- Picking Out the Perfect Wheelchair Fashion
- Adaptive Make-Up Application
- Hitting the Dance Floor
________________________________________________________________________________
WHEELCHAIR SEASONAL WEATHER SAFETY TIPS
____
Winter Weather Tips
PRACTICAL TIPS FOR WHEELCHAIR USE IN WINTRY WEATHER
Well, Jack Frost was at it again and made his mark across the Philadelphia region this week. While some may revel in the beauty of a fresh coat of white powder, it’s probably no surprise that Jack Frost is generally no friend to folks using wheelchairs.
Wheelchair users from around the world have come up with some pretty creative ideas to battle the white stuff, ranging from chairs equipped with military grade flamethrowers, to snowplow and ski-like attachments. Ingenuity is certainly not lacking in these concepts, but practicality? Well, that maybe somewhat limited.
In an effort to come up with some more sensible solutions for fighting the frost, we asked some of our Magee friends for advice. Here’s what they had to say:
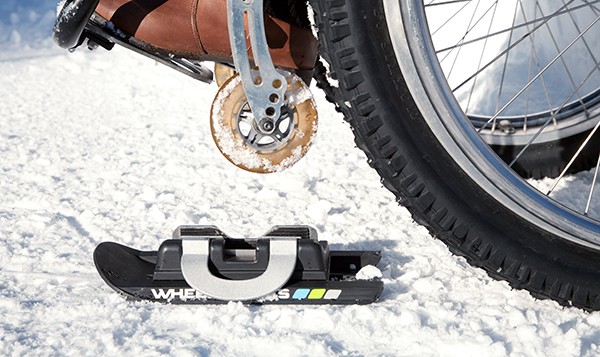
- Test your treads. You don’t need a set of Michelin Ice Monster 5000s, but before winter comes, it’s a good idea to make sure your tires are not worn and dull. Checking your wheels routinely is sound advice, because even in just wet weather, bald tires can cause chairs to slip and slide. On manual chairs, wider knobby tires will give you more traction in the snow. Changing back tires for more traction in snowy conditions will help. Front castors and foot plates can still dig in and get stuck. The snow and ice make matters worse and a face full of snow due to a fall is just simply not fun. Here are some tread tips:
- Add Mini Ski’s in place of front casters
- With FreeWheel, your wheelchair casters are lifted off the ground turning you into a 3-wheel all-terrain chair
- Action Trackchair lets you navigate any terrain! Over the mountains and through the woods…
- Wire ties or chains can also be put on tires. Do not go indoors with chains on; they may scratch floors.
- Be wary of ramps and inclines. Just because there’s a sign stating an entrance or path is accessible doesn’t mean the incline is negotiable for all chairs, and it definitely means very little if the surface is covered in snow and ice. Even a light dusting can render ramps of approved grades treacherous, so proceed with caution and get help if you are unsure. Keep ramps and walkways clear. Try using:
- Table salt (Rock salt may be slippery.)
- Cat litter
- Spray on traction
- Non-skid tread plates
- Get a grip. Your wheels will get wet, so having a good pair of gloves that will keep your hands dry is essential. Make sure they have leather or other protective non-skid material inside the palm area for a solid grip. And word to the wise… don’t try to remove them with your teeth. The salt from the streets is not very tasty. Blah.
- Plan extra time. Just like in the rain, normal daily activities take even longer in the snow, so plan ahead. Don’t try to cut out steps when transferring into your car or van, make sure the brakes are locked, but also that the chair is in a safe place and will not slide. It’s when we try to change our normal routine that we can end up making costly mistakes! Assume it’s just going to take longer to get to and from anywhere. Extra layers, extra steps, extra time.
- Be a good guest. If you are visiting someone’s house, warn them ahead of time that your tires could leave tracks. They might want to put something protective on the floor so you don’t blemish their carpets. Keep a small towel with you to wipe your wheels off when going indoors, and do this before taking your gloves off!
- Layer up. For those with spinal cord injuries, keeping the body warm during the winter months can be difficult. And once frozen, it can take a LONG time to thaw out. Dress in several dry layers to combat the cold, and cover legs in a low heat blanket if you can for a short period of time upon returning indoors (just be careful to check skin every few minutes and monitor to avoid burns or overheating).
- Don’t push it. Don’t attempt to go through any snow that is deeper than 1-1/2 inches (especially if it is wet snow and not the fluffy stuff). Whether you use a manual chair or a power chair, you will get stuck.
- Take precaution. Make sure your power wheelchair batteries are charged. Batteries lose 60% of their charge when temperatures reach 0 degrees. Wipe down all surfaces of your chair after being in snow, as this prevents rusting. And of course, make sure to wear warm clothing and have extra supplies with you in case you get stuck somewhere.
- Use good judgment. And if you generally don’t have good judgment, listen to someone who does. Now is not the time to throw caution to the wind and become adventurous. No one likes to be cooped up, but just as there are times when even 4 wheel drive monster trucks should not be out on the road, there will be times when the conditions outside are just too much to safely handle. On those days, just stay inside.
We’d love to add other practical advice to our list! If you have suggestions that have worked well for you please let us know so we can pass along. In the meantime, stay warm!
BABY, IT’S COLD OUTSIDE – DRESSING FOR WINTER WEATHER IN YOUR WHEELCHAIR
Dressing for warmth can be a tough task. Bulky layers tend to be uncomfortable, and wheelchair users have to take into consideration many other factors and complications that can occur when trying to stay warm. Issues such as skin integrity, toileting accessibility, temperature regulation, dressing method, and management of the wheelchair in the cold are all considerations that need to be taken when a wheelchair user is getting prepared to brave wicked winds and dropping temperatures.
Designers have begun the process of fabricating fashionable clothing for the wheelchair user. For those dressing up a bit, elastic wasted designer jeans without rear pockets exist to lessen the burden of putting them on and maintaining good skin integrity while looking good. Ladies may appreciate the use of long dresses for staying warm and improving the ease of dressing and toileting. For a more laid-back look, try zip-up sweatpants to improve independence with toileting and dressing while staying comfortable.
Individuals using a manual wheelchair should invest in a good pair of winter gloves with grips on the palm and finger tips to provide friction and warmth when propelling the wheelchair. Others who are driving a power chair may benefit from mittens. A warm lap blanket is always a good addition to keep you toasty. A nice pair of warm boots will keep your feet protected and dry in harsh weather conditions. Think warm thoughts and check the weather before you leave the house!
____
Summer Weather Tips

SUN SAFETY IN YOUR WHEELCHAIR
Summertime is officially here! Time for the beach, pool, and good ole sunshine! We are all looking forward to the warmth of the sun after this brutal winter. There are benefits from the sun exposure including stimulating production of Vitamin D and improving mental well-being. However, we know excessive sun exposure can lead to sunburn, even causing first degree burns or skin cancer. But what if you use a wheelchair? There are a few more things that you need to think about:
- Be careful about sitting out in the sun too long. Parts of your chair like your armrests and leg rests can get hot. You could get a serious burn from these parts of your chair.
- If you wear shorts, your knees are prone to burn. Be aware of your feet, too. If you wear sandals or go barefoot by the pool or on the beach, your feet are at risk as well. Use sunscreen.
- Certain medications put you at greater risk for sunburn. These include certain antibiotics and diabetes medications. You can find more info here.
- Stay well hydrated. This means plenty of water. Beverages with alcohol and caffeine only dehydrate you more. Add some fruit for a little extra flavor.
Remember, just because you don’t feel, it doesn’t mean it doesn’t hurt. Even a little bit of sunburn damages your skin. Wear plenty of sunblock, a hat, and enjoy the sun in small doses.
____
Spring Weather Tips

APRIL SHOWERS – WHEELING IN WET WEATHER
We’ve all wished away rainy days. Sure “April showers bring May flowers,” but that whole positive outlook only lasts for so long before you just want to see some sunshine! Though a few rainy days can make some folks gloomy, wet weather can bring real challenges for those using wheelchairs as their main means for getting around.
Let’s face it; it’s not as simple as whipping out an umbrella and perhaps a pair of goulashes. How do you stay dry while propelling a chair around town? How can you keep from looking like a mud puddle attacked you when you arrive at your destination? If you use a power wheelchair, can you still get out and about when it’s drizzling?
Here are some practical tips for wheeling in the rain from a few of Magee’s experts:
- Plan your path. Keep an eye out for places that tend to flood. Curb cuts without adequate drainage nearby are infamous places for puddles. If you have help, ask someone to go out after a rain storm and take a look at any common outdoor routes you travel to see if they are typically passable. If not, establish alternative routes.
- Accessorize…if you wish. There are oodles of products out there all claiming to be the ultimate solution to keeping dry while using a wheelchair. Be a smart shopper and do your research before you buy. Ponchos made specifically for wheelchair use can be great especially for someone with a helper pushing the chair. For independent users however, they can be bulky and get in the way. Similarly, canopies or umbrellas that attach to the chair or body can be useful for some, but others may find them a nuisance and not worth the hassle. Hats, gloves and other water-resistant clothing options are smart to help stay dry, but be sure to practice transfers with all the gear in place to ensure it doesn’t hinder performance.
- Keep an eye on the sky, but also the ground. Surfaces that are typically easy terrain can become incredibly challenging when wet. Bricks and other stone paved areas can turn slick quick. Wooden ramps or decking without appropriate tread can become very slippery making uphill propulsion tricky and downhill downright dangerous. Dirt or gravel surfaces that are normally negotiable when dry can become mud traps during or after rain. Test the terrain when it’s wet before traveling independently if you are able.
- Protect your power. It’s true, electronics and water typically do not mix, and thus power wheelchairs come with their own hindrances. While a few raindrops will not likely be detrimental, most controls are not able to hold up against hours outside in a downpour. Manufacturer’s recommendations should always be reviewed, but in general a common-sense approach to using power chairs in the rain is your best bet.
- Take your time. It is so easy to want to move faster when it’s raining, but so important to take your time. Wet rims can allow hands to slip, causing you to lose a little control of the chair. Most importantly, it is critical to not cut out steps due to rain, especially when transferring out of the car. Make sure brakes are on and wheels are not slipping on the wet ground. Water will dry, but skin issues or injuries due to a poor transfer will take a lot longer to resolve.
Remember… it takes both rain and sunshine to make a rainbow. Happy spring!
____
Fall Weather Tips

WHEELING AROUND AUTUMN
Wheelchairs are used for a variety of reasons, whether it’s to provide a sense of comfort, independence, or the capability to enjoy life to the fullest. During the autumn, there are a variety of hazards that can make traveling in a wheelchair dangerous. Keep yourself and your loved ones safe with these practical tips for wheeling in the fall from a few of Magee’s experts:
- Be mindful of fallen leaves and debris. The leaves on the trees turn from green to orange and red, making for a picturesque scene, but when the leaves fall and cover the ground, they can make for a slippery terrain. While you’re wheeling around, take note of big piles of leaves or fallen branches that may be difficult to navigate through.
- Dress appropriately. The weather during the fall can be unpredictable, so it’s important to layer up. Keep a blanket on the seat of your wheelchair to use when it’s breezy. Gloves, hats, and scarves can also come in handy on extra blustery days. It’s also a good idea to keep an umbrella stowed in the back of your wheelchair – fall rainstorms can develop at a moments notice!
- Pack extra. If you’re headed out for a while and you have an electric wheelchair or other medical equipment, like oxygen tanks, be sure to bring extra along for your journey so that you don’t have to cut your trip short. If you’re visiting a house, pack supplies to clear off your wheelchair upon arrival. Keep a small towel in your bag to wipe your tires free from rain, leaves, and other fall debris that may have collected in the spools of the wheels.
- Plan accordingly. Where you’re headed will determine your best course of action. For instance, if you’re headed to a local festival that’s primarily outdoors, ensure there’s handicap parking and wheelchair accessible ramps available. If you’re headed to a more specific destination, like a friend or family members, ensure that their house is accessible for you.
Stay comfortable and mobile this fall with these safety tips!
________________________________________________________________________________
WHEELCHAIR ACCESSIBLE SPORTS TIPS
____
Basketball
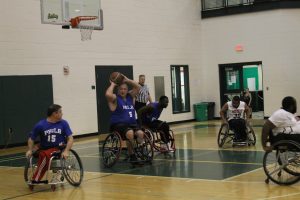
Wheelchair basketball is an exciting sport of skill and teamwork. Whether you’re an athlete with an amputation, a spinal cord injury, multiple sclerosis, or another lower extremity disability, basketball is a great way to get exercise, and have fun. The rules of wheelchair basketball are slightly modified to make the game more accessible from a seated position. To play the sport, athletes must be able to push a manual wheelchair independently.
General Rules for Wheelchair Basketball
- Player Contact. The wheelchair is considered part of the player, and as such, the rules of regular basketball regarding charging, blocking, etc. apply to wheelchair basketball as well.
- Time Constraints. A player on the offense cannot remain in the key longer than 3 seconds while their team is in possession of the ball.
- Dribbling. Players in possession of the ball must dribble the ball to the floor every two pushes of their chair. Players may wheel the chair and dribble the ball simultaneously if they are capable.
- Physical Advantage Foul. Because of the varying degree of disability amongst participants, every player must remain seated in their chair at all times. Players are not permitted to use their legs or other parts of their body as a physical advantage over other players. An infraction of this rule results in a physical advantage foul. Three of these fouls disqualifies a player from the game and two free throws are awarded to the opposing team each time an infraction occurs.
For more information about wheelchair basketball visit www.nwba.org.
Interested in joining the Magee Spokesmen? Contact Magee’s Community Program Coordinator at 215-587-3412 or sports@jefferson.edu Practices are held every Wednesday evening from 6:30-9 pm (September-May) at Carousel House (corner of Belmont Ave. and Avenue of the Republic, Philadelphia, PA 19131).
____
Racing

RACE TRAINING WITH A DISABILITY
Many races around the world offer great opportunities for individuals with disabilities to push their limits and get involved. Signing up for and competing in a race should not be an obstacle, regardless of disability. Whether it’s an amputation, paralysis, vision or hearing impairments, brain injury, or other disability that might be holding you back, get motivated and start training with the tips below.
Where to start:
- Get involved. Contact local running groups or shoe stores to be a part of scheduled group runs. Let them know your needs whether it is someone to guide you visually or picking a route with minimal traffic.
- Pick a chair. You don’t need to do your first race with a racing chair. For shorter distances you can use a sports chair (basketball, rugby, tennis, etc.) or even a standard chair. If you’re committed but don’t want to spend too much money early on then go with a used chair. You can also reach out to organizations such as the DSUSA or other adaptive sports programs for loaner chairs.
- Sign up. Look for a shorter race such as a 1 miler or 5k to get your feet wet. If you’re using a wheelchair, make sure they have a wheelchair division. If they don’t have one, then talk to the race director and ask to include one and to start a few minutes ahead of the crowd.
Training:
- Set microgoals. Have your race distance in mind and marked on the calendar but set weekly goals to build up your technique and endurance.
- Avoid injury. Speak to a therapist, personal trainer or physician who is familiar with your disability during your training. Overuse injuries are one of the most common reasons for training interruptions and race drop outs. Make sure you are using proper body mechanics (including push stroke), you’re gradually ramping up your training, you are incorporating cross training, and rest days are mixed into your training plan.
- Stay safe. Train with a medical alert identification on your body. Use a customized necklace, bracelet, or other indicator that can notify a bystander or medical team about your medical condition. Sites such as Lauren’s Hope and N-Style ID offer stylish options while most neighborhood pharmacies can customize them as well. Also, let a point person know where you’re going and your estimated training time in case of an emergency.
- Get a training partner. Pick a friend or family member who is motivated and accountable. Set weekly or daily training routines and push each other. It will be as rewarding for you as it is for them.
- Do a trial run. Get mentally prepared with a dress rehearsal at least a week before your race. Wear what you think you’ll wear on race day, find a similar (or the same) course, begin at the designated starting time, use the same equipment, and eat the same pre-race meal you would on race day.
Race Day Ready:
- Race prep. Lay out your race gear the night before. Get to the start early. Stay hydrated. And do a quick warm up before the race.
- Stay routine. Don’t do anything new on race day to avoid last minute glitches. Stick to your routine and don’t wear new clothing, use gels (or new gels) if you haven’t used them before, make changes to equipment, or exceed your pre-determined race pace.
- Have fun. Race day is the day to appreciate all of the hard training and sacrifices. Make sure to take in the environment and have fun!
Magee sponsors members of the wheelchair racing community in local races including the Philadelphia Marathon, Rothman 8K and Broad Street Run. Participants can use a racing chair or hand cycle, depending on the race.
Interested in joining the Magee wheelchair racing team? Contact Magee’s Community Program Coordinator at jefferson.edu or 215-587-3412.
____
Rugby
WHEELCHAIR RUGBY: A SPORT LIKE ANY OTHER
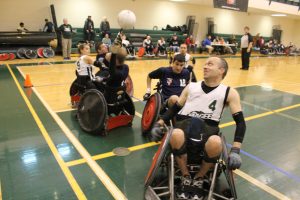
A wheelchair shouldn’t stop you from being active, even in aggressive sports like rugby. To play rugby in a wheelchair, you’ll need a specialty chair. Players are permitted to use the palms or the backs of their hands to drive the wheels.
Some general rules for wheelchair rugby include:
- To qualify for the sport participants must have impairments in both their upper and lower extremities.
- Played on a court similar to that of a standard basketball court.
- Max of four people from each team can be on the court at once.
- To score, one person must cross the goal line while holding the ball in their lap or hand.
- The ball must be. Dribbled or passed every 10 seconds.
- Chair to chair contact between opponents is legal and encouraged during game play.
Equipment for Wheelchair Rugby
- Rugby chair. A chair made of aluminum designed to fit the shape and size of your body allows for better rugby play. The drive wheels should be enforced with special rims and fitted with guards to maximize your ability on the court.
- Gloves. Custom leather or rubber gloves help prevent slippage during the game. Typically, gloves are taped into place so that they don’t come off during play.
- Safety belt. A belt or soft corset helps hold players in their wheelchairs during the match. The belt is strapped around the player and the back of the wheelchair to prevent loss of balance.
A sport unlike any other; Magee Eagles Quad Rugby is as competitive as it is intense! Players collide, literally, as the teams of four scramble to push a volleyball down a basketball court through their opponents’ zone and across the goal line. Play is fast-paced and rough as the players skillfully navigate around the court. For more information about the United States Quad Rugby Association visit their site here.
Practices are held Tuesday evenings from 6:30 pm-9 pm (September-May) at Carousel House (corner of Belmont Ave.& Avenue of the Republic, Philadelphia, PA 19131).
Interested in joining the Magee Eagles? Contact Magee’s Community Program Coordinator at sports@jefferson.edu or 215-587-3412.
____
Tennis

WHEELCHAIR TENNIS: WHAT’S NOT TO LOVE?
Are you in a wheelchair and want to stay active? Did you know that it is possible to participate in recreational athletics with friends and family while in a wheelchair? One of the sports you can play together is wheelchair tennis. And take it from us – there’s a lot to love (pun absolutely intended).
Wheelchair tennis can be played by anyone with a mobility-related physical disability involving the loss of function in at least one of your legs. There is even a competitive division for individuals who have cervical level injuries. Just like able-bodied tennis, wheelchair tennis can be played in singles or doubles matches. But unlike able-bodied tennis, there are a lot of options:
- Singles: wheelchair athlete on wheelchair athlete
- Singles: wheelchair athlete on stand up athlete
- Doubles: wheelchair athletes on wheelchair athletes
- Doubles: wheelchair athletes on stand up athletes
- Doubles: 1 up 1 down (wheelchair athlete and stand up athlete together on both sides)
The rules for wheelchair tennis are very similar to traditional tennis. The court is the same size and the matches follow the same rules set by the International Tennis Federation, with one exception: the tennis ball is allowed to bounce twice before a return must be made, of which only the first bounce must be within the lines of the court.
Specific wheelchairs used to play tennis are also different from your everyday chair. The wheelchair tennis chair has larger wheels that are angled to allow for the fast and smooth turns needed for a successful return. The tennis chair also has two small wheels in the front next to the footrest and one wheel centered in the back for support. Tennis chairs are lighter, which is important as wheelchair tennis athletes are always moving about the court.
Wheelchair tennis is a brilliant adaptation to an incredible game. Almost nothing is changed from the rules of able-bodied Tennis. Athletes use the same courts, rackets, and balls to compete; the only modification is a rule allowing a second bounce before a person in a wheelchair must return the ball. Since wheelchair tennis is so close to able-bodied tennis, athletes can practice and compete with friends and family who may or may not use wheelchairs. For more information about wheelchair tennis visit their Wheelchair Tennis page here.
Magee sponsors a wheelchair tennis team called the Magee Freedoms. Our tennis program holds practices every Sunday at the Cherry Hill Racquet Club, located at 1820 Old Cuthbert Road, Cherry Hill, NJ 08034. So far this year our athletes have competed in tournaments in New York, Virginia, Louisiana, and Texas. Don’t have a wheelchair tennis chair? Don’t worry – as part of our Wheelchair Sports Program, if you want to be on the team, we will make sure you have one.
For more information about wheelchair tennis at Magee, please contact Keith Newerla, Magee’s Wheelchair Sports Program Coordinator, at knewerla@mageerehab.org or 215-587-3412. And if you want to see wheelchair tennis in action, check out the video below.
Magee Freedoms Practice Location: Cherry Hill Racquet Club (1820 Old Cuthbert Road, Cherry Hill, NJ 08034)
Interested in joining the Magee Freedoms or attending a practice? Contact Magee’s Wheelchair Sports Coordinator at sports@mageerehab.org or 215-587-3412.
____
Sled Hockey

WHAT IN THE H-E-DOUBLE-HOCKEY-STICKS IS SLED HOCKEY?
You have probably heard of wheelchair basketball. Maybe even quad rugby. But sled hockey (or sledge hockey as it is called outside the US)? What in the H-E-double-hockey-sticks is that?
Well, sled hockey is a sport that allows individuals with disabilities to play and enjoy ice hockey. Sled hockey was invented in Stockholm, Sweden at a rehabilitation center in the early 1960s by a group of people who wanted to continue playing hockey despite their disabilities.
Sled hockey is very similar to ice hockey in terms of rules; the main difference is that participants sit on a sled with two skate blades on the bottom instead of skating on foot. Another difference is that instead of one stick, sled hockey players use two shortened sticks with a pick on one end to maneuver the sled, and a blade on the other to shoot the puck.
Like ice hockey, unless there is a penalty, there are six players on the ice at a time for each team. There are three forwards, two defensemen, and one goalie. Sled hockey has the same intensity and action as ice hockey, and anyone who has a disability that would prevent them from playing ice hockey is a candidate for sled hockey. It allows individuals with mobility limitations, such as amputees and people with paraplegia, to play the game of hockey. It does, however, require great upper body strength and balance.
The popularity of sled hockey is picking up in the US. The 4th Annual USA Hockey Sled Classic was held in Pittsburgh November 21-24. It featured 16 teams representing 14 NHL franchises and enjoyed a record turnout as several sled hockey players competed in three different divisions. Also, sled hockey will once again be included in the 2014 Paralympic Games, which will be held in Sochi, Russia in March 2014. At the last Paralympic games at Vancouver B.C. in 2010, the United States won the gold medal in sled hockey and hopes to do the same this year. Below is a small video teasing the full USA Hockey sled hockey instructional video.
________________________________________________________________________________
WHEELCHAIR ACCESSIBLE ACTIVITIES TIPS
____
Wheelchair Accessible Trails

Interested to know the best places to take my everyday chair ‘off road’ without having an all-terrain chair?
You don’t have to have an all-terrain wheelchair to enjoy the trails. There are many places to go with a wheelchair off road without an all-terrain wheelchair. We asked our peers for recommendations in the Delaware Valley area – here’s what they had to say:
- “French Creek State Park in Berks County on the opposite side of Hopewell Lake by the pool that meander through the woods and leading back to the dam with spectacular views. There are accessible picnic tables and bathrooms on the routes, too.”
- “There’s Black Rock Sanctuary in Phoenixville area”
- “Go on this website put out by DCNR called Explore PA Trails. Look for the trails with the blue handicap insignia.” Check it out here!
- “There’s a website called Trails.com for PA. All these trails are “accessible” and located mostly in the woods and along scenic rivers.” Check it out here!
- “One more resource I use if you want to go camping, fishing, hunting or sight seeing is DCNR’s PA State Parks. Scroll through the sites and look for the blue handicap sign within all the activities in each state park. We have camped at many of these parks. Camping, fishing, riding the trails, all with my wheelchair.”
- “Ridley Creek State Park in DelCo is great. They have a 5 mile multi-use paved loop for walkers and bikers that takes you through woods and can with views of a running creek, adjacent farmer’s fields and nature preserves. Great outdoor pavilions for grilling and family activities most reachable by car. Even have functioning horse stables to tour.”
- “There’s a trail at Blue Marsh Lake Bernville, PA. It’s a really nice trail.”
- “Core Creek State Park in Bucks County is very nice and has paved roads that people share with cars – not really off-road, but very naturish. The Wissahickon at Valley Green (Chestnut Hill) is a bridal path for runners, horses (walking) and bikes. A little bumpy, but very doable in manual or power. Be prepared for dust, though.”
In case you didn’t find what you were looking for, here is a list of more trails and resources to help you book your next off-road adventure:
- American Trails of PA
- TrailLink: New Jersey Wheelchair Accessible Trails
- New York & New Jersey Wheelchair Accessible Trails
- Bala Cynwyd Heritage Trail
- Radnor Township Bike Trail
- East Goshen Park Trail– Paoli Pike
- Morris Arboretum (with admission)- Chestnut Hill
- Schuylkill River Trail
- Valley Forge Park
Do you have any more trails or resources to add? Let us know!
____
Attending Concerts in a Wheelchair

ROCKIN’ ON WHEELS: 5 TIPS FOR THE ULTIMATE CONCERT EXPERIENCE
For new wheelchair users, the thought of attending an event with large or even small crowds in unknown territory can be daunting for sure. Where to park, what entrance to use, and where to stay cool are just a few questions that may arise.
The Americans with Disabilities Act (ADA) puts forth specific requirements for accessibility in public arenas. Thankfully, many venues have taken steps to assure all concert goers have a great experience. Some facilities have done a better job with this than others, and have lots of info available on their websites to assist attendees in any way they can. Others have little in the way of online resources and simply tell you to call ahead. The Firefly Festival website offers a great example of an ADA friendly venue.
At Magee, we don’t want to see a physical disability get in the way of rocking out. Here are a few tips compiled with input from Magee wheelchair sports coordinator, wheelchair user and frequent concert goer Keith Newerla for a hindrance-free experience.
- Call ahead. Bottom line is no two places are alike. Although some venues have great info available on-line, always call ahead to verify. Let them know you are a person with a disability and what your exact needs are.
- Know your ticket options. You should be able to purchase tickets through disabled services for yourself and your group, and most sites have a variety of options to accommodate different situations. One companion seat is required to be provided in the same area as the accessible seat. For outdoor music festivals with only general admission, a regular ticket is purchased, but some venues have special elevated areas or platforms for attendees using wheelchairs to have clearer views of the stage. Just ask.
- Be picky when picking your seat. Well, maybe not picky, but specific. Wheelchair seating is available throughout most venues. A wheelchair seating ticket assigns you to a specific space that you are entitled to occupy and can roll right up to. You will use your wheelchair as your actual seat for the duration of the event. Typically, there are also several aisle transfer seats located throughout a venue. These seats have armrests that fold up for easier access to transfer in and out of. Be specific about which type of seating you are seeking when you call.
- Know what you need and where it’s located. Find out where important things are located relative to your seats before you go, such as accessible bathrooms, shaded areas for cooling down, power sources for charging scooters, chairs, or ventilators. If you are transferring into a stadium seat during the performance, ask where your wheelchair can be safely stored during the show.
- Make sure there’s room for Spot. Service dogs should be welcome and able to rest in the seating area with you rather than in the aisle. It’s always a good idea to mention this when purchasing tickets or when calling ahead though to assure there’s room. If you find a place that is not accommodating to service animals… let us know.
If you follow these tips, you’ll be ready to rock!
____
Adaptive Surfing
ADAPTIVE SURFING: YOU, TOO, CAN RIP!
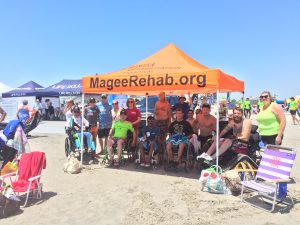
There is nothing quite like the freedom of surfing. Wind in your face, saltwater in the air, and the power of the waves beneath you all make for an exhilarating experience. And thanks to They Will Surf Again by Life Rolls On, more people can experience the thrill of catching a wave. This award-winning program empowers paraplegics and quadriplegics to experience the freedom of mobility by riding a wave with the assistance of adaptive equipment and the support of hard working volunteers.
If you’re interested in attending a future event, here are a few things to keep in mind.
Equipment. Life Rolls On will provide you with all the equipment you need, including a wet suit, life jacket, and soft top surfboard. There are various types of adaptations made to the surfboards depending on levels of injury and functional use of upper/lower extremities to make it easier to hold on if needed. You just need to bring a swimsuit, towel, sunscreen and STOKE.
Safety. Always check with a physician before you engage in any physical activity. Here are a few things to look out for.
- Always protect your skin! Wet suits are recommended no matter what to help protect your skin in the water.
- Be mindful of your time spent in the sun. Keep hydrated and seek shade frequently. The organization is located near an indoor shelter and they make it easy to find shade by setting up tents all over the beach.
- Be knowledgeable about the signs and symptoms of Autonomic Dysreflexia, a potentially life threatening condition that is caused by a stimulus below the level of injury. Symptoms include pounding headache, sweating, flushed/red face, high blood pressure, goose bumps, nausea, slow pulse, and a stuffy nose. If this should happen, remove the stimulus, remove tight clothing, make sure you are sitting up, lower the legs if possible, and inform the medical personnel volunteering that day.
Most importantly, have fun! There is no feeling like catching a wave, and like the Beach Boys say, “Sitting on top the world.” So smile and have a great time! There are hundreds of volunteers to assist you if needed. You will have to transfer from your wheelchair to a beach chair and then to a surfboard. You are your biggest advocate, so know how to direct your care. Water volunteers are required, so each surfer has about 30 people in the water with them at all different water levels (shallow, medium, and deep). Bring your family and friends and meet new people!
To learn more about Life Rolls On and They Will Surf Again, visit the site here. Never seen adaptive surfing in action? Check out the video below!
________________________________________________________________________________
WHEELCHAIR ACCESSIBLE HOME TIPS
____
Kitchen Accessibility
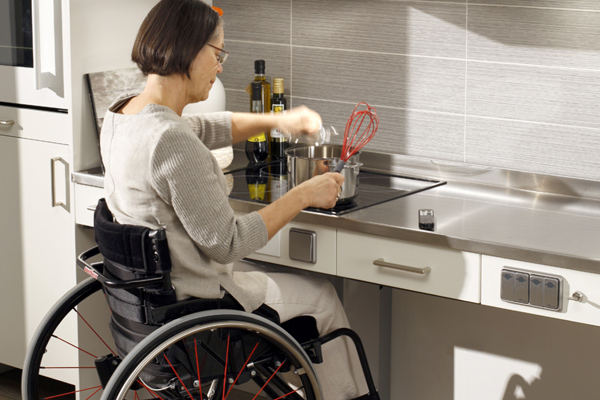
5 WAYS TO MAKE YOUR KITCHEN MORE ACCESSIBLE WITHOUT REMODELING
There is nothing quite like the comfort of a home-cooked meal. But when you are living with paralysis, the process of cooking can be very difficult in a standard kitchen – especially if you also have hand paralysis. While ultimately a remodel of your kitchen will make things easier and safer, not everyone can afford to make this change immediately.
But the good news is there are many simply ways to make your kitchen more accessible without calling the contractor. Here are 5 to get you started.
- Rearrange. Just rearranging your kitchen can make cooking much easier. For example, put items that you use regularly, such as bowls or cookware, on shelves in bottom cabinets or other places easier to reach. Place these items between waist and should height for the easiest access. To make things even more efficient, place those items on a Lazy Susan – that way, you don’t have to dig or reach to get what you want.
- Get a microwave oven. The microwave gets a bad rap – but contrary to popular belief, it’s not just for popcorn and frozen meals! When you are in a wheelchair, a microwave is much safer than using a standard oven, and you can use it to cook just about anything. Plus, just as with anything, there are different levels of microwaves. A nicer one will run you more, but it will also give you more flexibility.
- Gadgets, galore! Who doesn’t love kitchen gadgets? And trust us, there are a ton out there designed to make your life a lot easier. Hands free salad spinners, two-handed slicers, touch can openers, lap cutting boards, and so much more. There are some great videos on YouTube that review and demo these tools. Some of our favorites come from YouTube user imbonnie who has very cool gadgets that can be bought just about anywhere. Check out her YouTube channel here!
- Bring in a corner table. Chances are, the counter-tops in your kitchen are a little too high to be used for food preparation. If that’s the case, one solution is to bring in a corner table. Be sure to put the table in an area where it won’t be in your way as you travel throughout the kitchen. The tabletop should be no higher than 30 inches, which is a little shorter than the average tabletop, but still high enough to fit your wheelchair under. Even better, go for a pedestal base so you can move around the table freely.
- Get creative with containers. There’s no law that says you have to keep your spices, oils, etc. in their original containers. In fact, switching them to containers that are easier for you to handle is a simple way to make your kitchen more accessible. For example, putting your olive oil in an easy grip water bottle or handles on your pasta containers. Our YouTube friend imbonnie has some suggestions for that as well.
As we said, these are just a few simply ways to make your kitchen more accessible without remodeling. This is certainly not an exhaustive list! For more tips, check out our Home Accessibility page on MageeRehab.org.
____
Best Flooring for a Wheelchair User
Flooring is a big investment that usually has a direct impact on wheelchair maneuverability in your home. Along with maneuverability, one needs to consider durability, ease of care and aesthetics. Of the responses we got, everyone agreed carpet was the most difficult to maintain and get around on. Most people recommend hardwood. Tile, linoleum, laminate and hardwood were all recommended for wheelchair maneuverability, but long term durability was a concern with laminate and linoleum. It was suggested if using those products to get a high grade. Below are a few of the comments sent in by the peer alumni.
- “If you go with laminate, make sure its industrial. I’ve had the wear of the tires cause it to pull up at the seams. Also, the laminate faded in heavy traffic areas. I now have hard wood throughout and love it. The only concern is finding area rugs that are very low profile. The non-skid carpet lining for under area rugs works well.”
- “Tight grooved wood is great…Laminated less expensive, but get good grade…tile…Grout can get dirty. Pergamen is like wood but not as expensive as real wood……Would go with a light color so WC tracks don’t show.”
- “I recommend an engineered hardwood because it is smooth, attractive, and durable. I wish I would have done the engineered over the solid.”
- “Of importance is the transition from one surface to another. We ended up with a quarter to a half inch difference in the floor height between the dining room and kitchen and between the living room and the entryway. So I have to pop over the threshold in each case—not a huge problem, but it could cause a drink on my lap to spill if I’m not very careful.”
- “We got a super deal on some walnut that was on a closeout sale that was very inexpensive per square foot compared to maple, cherry and oak. But the key is to make sure it is already “tongue and groove” pre-cut. That means every board will lock into each other when you lay them down. That keeps them snug and will not buckle for your wheelchair when turning, and also handles the weight of any power chair. My power chair is 300 pounds, plus I’m 200+ so that’s pretty heavy. We put an “office” grade of high wear carpet in the living room and bedrooms. We looked at 6 different places and found Lumber Liquidators the cheapest and best quality.”
- “When we redid our house after my son’s accident (he has a big power chair) we looked at all of the above and decided on porcelain tile for its resistance a) to weight and b) to wear and tear. (My brother is an architect and he strongly recommended tile; he just as vehemently opposed laminate as flimsy.) Our house originally had wood and the parts where we kept the wood have suffered. There is wood-looking tile which is pretty good looking, everyone thinks its bamboo.”
____
House Hunting Tips

HOUSE HUNTING TIPS FOR PEOPLE WITH DISABILITIES
Looking for a new home can be exciting but when you have a disability it adds a bit of stress to the mix. Depending on your circumstances, there are added factors you need to look into when searching for your dream home.
- The most important part of your search is to find a real estate agent who understands your disability. They should be someone who knows what will work for you. This might require several discussions so that you can make them understand exactly what your needs are.
- If you use a wheelchair, you don’t want to be taken to a house with tiny rooms and narrow hallways/doorways. It is a waste of everyone’s time.
- Know what your budget is. How much can you afford to modify above the price of the house? Home renovations can be costly and stressful. Spend some time thinking about what type of modifications you want to make vs. what you can live with.
- It may be worth looking at a home that needs a little TLC and get it at a better price since you are going to have to make modifications anyway.
- Always take a portable ramp so that you can get inside to see homes for yourself when possible.
- If you can’t get into the home, make sure pictures and measurements are taken by someone you trust before you make any kind of decision.
- More and more people are opting for condo communities which are equipped with elevators that can minimize renovations. This could also go for renting an apartment. Another plus is that all common areas are taken care of for you – snow removal, lawn care, etc. Just pay attention to the additional monthly fees for these services. They vary place to place.
With a little luck and a lot of patience, you’ll find something you can be happy with for a long time.
________________________________________________________________________________
WHEELCHAIR ACCESSIBLE TRAVEL TIPS
____
Accessible Air Travel

We have all heard stories about the challenges of air travel for people with disabilities (and, let’s be honest, for able-bodied people as well). But it is not as bad as you might think! If this is your first trip post-injury or illness, you may not know what to expect. The experts at Magee are here to walk you through the process and give you their tips for making it as easy as possible. Follow these guides for wheelchair accessible air travel:
TIPS FOR BOOKING YOUR FLIGHT
Taking a trip on an airplane when you have a disability is easier than you might think! First, the experts at Magee Rehab are going to talk about the very first step: booking your flight. While this may seem self-explanatory, when you are living with a disability there are a few things you need to consider before you click “buy.”
Allow at least 90 minutes between connecting flights. If the trip you are taking requires a connection to another plane, remember that if you are in a wheelchair, or have a mobility impairment that requires extra time to safely board, you are among the first ones on the plane and the last ones off the plane. You should estimate that it takes anywhere from 15 to 25 minutes from the time the plane lands until you are able to be assisted off the plane. Since it will then take a few minutes to get to the connecting gate, and you need to board first, it is strongly suggested to allow at least 90 minutes between connections. And because nothing can ruin a trip quite like missing a flight, be sure to consider this when booking.
Let the airline know you need assistance before you ever get to the airport. After finding the itinerary you are interested in, make sure you list that you need assistance getting on and off of the plane. After you book the flight, you should follow up with a phone call to the airline as well, to ensure they have documented that you will need assistance boarding.
Make your seating requests explicit. In your follow-up call to the airline post-booking, you should ask them to assist you with seating, so you can be seated as close to the front as possible in an aisle seat. Often the airline will offer the first row in coach (also known as the “bulkhead row”) but try to avoid it whenever possible if you need assistance from a wheelchair into your seat on the plane. The armrests in those seats do not lift, and it would require two people to lift you in to your seat. It is recommended to sit in the 2nd or 3rd row in the main cabin because the armrests on those chairs will lift, making it very easy for you to transfer over to the seat. Be sure to be your own advocate and request the best seat for you.
These tips should help you get a ticket purchased and make it easy for you when it is time to fly. Next up? Where do you park at the airport?

GETTING TO THE AIRPORT
Second only to security and lost luggage, one of the biggest pains associated with air travel is how to get there – especially if you have a disability. But don’t let transport there prevent you from taking off.
- Public transportation. Public transportation gets a bad rap sometimes, but if it’s available in your area, it is a great option for going to and from the airport. If you’re in the City of Brotherly Love, you have a couple public transportation options: SEPTA’s Regional Rail Airport Line or accessible bus services on routes 37, 108 and 115. If you take the Regional Rail, the train stops at most terminals and offers elevator services at each. The bus also stops at most terminals. But a word of warning – if you are bringing a ton of luggage with you, remember you won’t have a ton of help. The SEPTA employees will certainly help you and your luggage get on and off the transport, but you’ll be on your own from there.
- Parking. If you’re going to drive in yourself, you have many different parking options depending on your airport. The garages at the airport all have accessible spots located close to the doors – but don’t rely on those, as they tend to fill up extremely quickly. But there are other parking options. At the Philadelphia International Airport, the Economy lot (which is the least expensive airport parking option) has plenty of accessible parking spots and offers bus transportation right to your terminal. The buses have lifts, so it’s a great option for wheelchair users. Another consideration for parking is the size of your vehicle. If you’re driving an over-sized wheelchair-accessible van, it may be too tall for some of the parking garages at the airport. The height limit for most garages is 6 feet. Be sure to call ahead to find out!
- Shuttle & valet services. These options can be a bit more expensive, but the convenience factor for someone with a disability is great. There are wheelchair accessible taxis and other door-to-door accessible shuttle services that will help you with your luggage and get you from your home to the airport without any worries.
If you want to drive to the airport, but don’t want to mess with parking, valets can be a great option. They make it very easy for anyone with a disability as you do not even have to get out of your car. Here’s how it works. You drive to their lot near the airport (you are sure to find PLENTY near any major airport) and pull out your cell phone and politely tell them you are out front and are disabled. Someone will quickly come out to greet you, at which point you should give them the details of your trip, a driver will come out to the car and you are off to the airport. You’ll stay in the driver’s seat the whole time, which makes it very easy. Once you arrive at the terminal, you’ll pull in to a spot, and the drivers will always ask how they can help. It’s quick and easy, and your car is safe.
So, there you have it. While finding transportation to the airport can be challenging when you have a disability, you have plenty of options. Now that we’re at the airport, the real fun can begin.
For more advice on accessible transportation, check out these tips and demos from former Magee patient Frankie LaMacchia. He’ll show you how to navigate taxis, trains, buses and everything in between.

CHECKING IN
Okay, your trip is booked, you’ve successfully got yourself to the airport – now what? Now it’s time for check-in. This is easy enough, but when you have a disability, there are a few extra things to consider. Here’s what you need to know about check-in:
- Arrive earlier. With air travel, there is always a possibility of delays – and not just for take-off. This is especially true when you have a disability – because there are a few more accommodations that may need to be made, there are a few more opportunities for things to get backed up. The earlier you can get to check-in, the better.
- Checking luggage. Arriving early is especially important if you are also checking luggage or have a service animal. It is important to make sure that the airline takes care of your wheelchair and doesn’t treat it like luggage. Take the time to let them know!
- Make sure seating is accurate. When you are checking in, whether online or at the airport, make sure your seating is what you had discussed when you booked your flight. If there is an error, speak up! You want to make your transfer and trip as easy on you as possible, so remember to be your own advocate.
- Ask for assistance. If you need assistance, check-in is the time to ask. Proceed to the lower level ticketing counters where you will see a sign for individuals with special needs to get to the front of the line. Once at the counter you will present your boarding pass and ID, as well as the luggage you want to check in. This is a good time to remind them if you will need assistance to board the plane. They will give you a special tag for your wheelchair at this time. too. If you need assistance getting to your gate let them know and it will be provided. If not, after you check in downstairs, you are able to proceed to your gate.
- At the gate. After you get through security, you’ll want to check in again at your gate. You’ll present them with your boarding pass and remind them that you will need assistance. You should stay close by so they can see you when it is time to board, as you will be the first one to board. If you have a service dog, be sure to let the staff at the gate know you have a service animal for assistance, and it is not a pet.
Next, we’ll tackle one of the biggest issues surrounding flying with a disability: going through the security checkpoint.

GETTING THROUGH SECURITY
Before You Go… Check out the TSA’s website, here, for people with disabilities or medical conditions. They have sections dedicated to specific conditions and functional limitations, from using a wheelchair or prosthesis to being unable to remove shoes or wait in lines. This is a great resource for specific questions this post may not answer.
You may want to consider using the TSA’s Notification Card. You do not – I repeat, do NOT – need to provide any medical documentation to a security officer. But if you would like to discreetly share your needs with security, this is one way to do it. You can download it here.
Once You’re There… Once you get to the security checkpoint there is a special line for disabled passengers. The agents usually direct you towards it, and it is helpful as you do not need to try to weave your way through the long and winding lines.
It begins by you placing your carry-on luggage on to the belt. Try to be sure that an agent sees you, especially if you can’t walk through the scanner as they will send an agent to meet you to perform the “pat-down.”
TSA Precheck… This service can help you really move quickly through the process, as you no longer need to have the “pat-down,” and will just have your hands and chair tested. If you travel a few times a year, or more, I have found it to be well worth the money. You can learn more about it by going to:
During Inspection… The agent will then lead you to a special area and explain the instructions for the inspection. It really is an easy and painless process as the agents have been specially trained on how to deal with our needs. They might ask if you can take your shoes off, to which you can politely tell them no, as they have a way to check them that does not require you to take them off and then struggle to put them back on again. They will also offer you the chance to have a private screening if you would prefer.
If you have any necessary medical liquids that are more than what is traditionally allowed, now is the time to tell them. They are allowed through the checkpoint, but they will need to be screened.
If you have a service dog, s/he will need to be screened, too. The TSA offers step-by-step instructions for that process here.
This is the time to be upfront about any medical devices (catheters, leg bags, ostomies), or sensitive areas that you have. They are typically very polite and respectful but do have an important job to do. They will check all areas with their hands, usually inspect your chair, test your shoes and hands, and then send you on your way.
This process, from start to finish, can take 15 to 20 minutes, though it’s often quicker. Make sure you have budgeted enough time to get to your gate.
If you follow the rules, and are upfront about any special issues or concerns, it should be a relatively quick process. Because I travel so much, I have helped to educate and train many TSA employees – and you can, too! They really do want it to be an easy experience for us, and the more comfortable we can make them about dealing with individuals with disabilities, the better it will be for everyone. And, if something does go wrong, or you are not feeling comfortable about the process, the best thing to do is to politely ask for a supervisor and be patient until one arrives. Above all, remember to be your own advocate!
Now that you’re through security, there’s just one thing left to do: board the plane and head to your destination.

BOARDING THE PLANE
You have checked in, made it through security and now it’s time for the last step before you are on your way to your vacation destination: boarding the plane. If you are a wheelchair user, it’s not quite as simple as finding your seat. If this is your first trip post injury or illness, read on for a step by step description of the boarding process, as well as my tips to make it a smooth trip before the trip.
Bathroom break. Okay, so technically this isn’t part of the boarding process – but it is a crucial last step before you get on the plane. In most cases, you’d want to be sure to visit the bathroom as close to boarding time as possible, since once you are in your seat, you are not getting out of it until you reach your destination. This is a very important step for you to think about on the day you are flying, as you may need to limit your fluid intake until you arrive at your destination. There are not usually wheelchairs on the plane, nor are the bathrooms big enough for you and a wheelchair, so be prepared before you board.
Transferring to the “Straight Back.” Once it is time to board, the team will escort you down to the airplane. If you can’t walk on to the plane, you’ll wheel down the jet way to the bottom where a special wheelchair, often called a “straight back,” awaits you. With the proper assistance from trained staff, you’ll transfer on to it, and help with the safety straps. If you fly quite often, you’ll have this routine down, and even have the straps on before the people even look up!
You’ll then take your cushion and side guards off your chair and take them on the plane with you. DO NOT leave anything on your chair that is not bolted down on the chair when it goes to be stored below, or you could be disappointed when you get your chair back. Things can move around while in flight and it is very easy for something like a side guard to come loose and get lost. It is also recommended that you fold the back down on your chair so to make it easy for them.
Getting to Your Seat. Once all of this is done, the agents will push the special chair on to the plane, get you to your seat, and you’ll transfer over to it. If you need assistance, just ask – they will happily lift you in to your seat. At this point, it is time to put your seat belt on, get comfortable, and relax, since you will be in your seat until the plane lands. It is recommended that you choose to sit on your cushion to protect your skin. Also, be sure to do weight shifts while in the air, just like you would if you were sitting in your chair.
And that’s all there is to it! We hope you learned a thing or two, bon voyage!
____
Booking an Accessible Cruise

Cruising is a great way for individuals with disabilities to see a lot of different places over the course of a week, without having to move luggage around. Cruise ships have also done a very good job at making things accessible for us, too, with larger rooms, wider doors and a helpful attitude of staff members. Want to book your accessible cruise, but aren’t sure where to begin?
Book early. The only challenge with cruising is that the amount of wheelchair accessible cabins is very limited on each ship, so planning is necessary. Thankfully, the laws for booking things online changed in 2010, and now most cruise line websites make it easy to look for accessible cabins, as opposed to having to call to get assistance.
Check the ports. Just because the ship is accessible doesn’t mean all the ports are. There’s a big difference when the ship is “docked” in port, as opposed to being “tendered.” Sometimes the tenders aren’t easily accessible to get you off the ship and onto the land in port, so you will want to check ahead of time. You can also check to see if there are wheelchair accessible excursions at some of the ports you’ll be making so you have a chance to explore, but, if not, know that many of the cruise ports have areas for you to enjoy right off the ship, so don’t be discouraged.
Know the rooms. Accessible cabins on cruise ships usually have a great set up. They are usually larger than a regular size cabin and have a larger bathroom with a roll-in shower. It is nice to know when you arrive, you will have nothing to worry about!
Don’t be afraid to ask. Every cruise line has a special department to help those of us with disabilities, so don’t be afraid to call and ask them questions.
Here is an example from the experiences of Magee Rehabilitation’s Mark Chilutti:
“I just booked a cruise on Royal Caribbean’s Jewel of the Seas that leaves out of San Juan, Puerto Rico and visits lots of different islands for 7 nights. It is comforting to know already that I will have a nice room with a bathroom and a roll-in shower that are safe and functional — as opposed to the crossing my fingers and hoping it will work. I am now in the process of booking excursions, and I am very happy to see that there are wheelchair accessible excursions available in most of the ports I will visit.”
____
Car Travel

HOLIDAY ROAD TRIPPING IN (AND OUT) OF YOUR WHEELCHAIR
With Thanksgiving fast approaching, you may be travelling to see family. Some of you may fly, but even more of you will engage in the time-honored tradition of a road trip. Few people like sitting in the car for hours and hours in holiday traffic. But when you’re a wheelchair user, the holiday road trip offers another set of challenges.
One of the first things I remember learning about, shortly after I learned how to transfer in to a wheelchair, was the importance of doing weight shifts and taking good care of my skin. It’s easy to forget about this, since I don’t have feeling from the chest down, but it is very, very important — even when you’re not in your wheelchair. But you can prevent hours on I-95 traffic from damaging your skin — here are a few of my tips.
When transferring out of the chair and in to the car, make sure your brakes are locked, and you have the proper angle and clearance to lift out of the wheelchair. Be sure not to drag your butt, and be conscious of things like scraping your hip, or twisting your knee the wrong way.
Once in the car, be aware of your posture and how you might be applying pressure in sensitive areas.
It doesn’t matter if you are a passenger or the driver, if you are going to be in the car for any amount of time more than 30 minutes, develop a way to do weight shifts.
If you are on a long road trip, consider sitting on your cushion, or maybe use a smaller type of cushion, so to be sure you don’t get to your destination only to find the beginning of a pressure sore.
Each of our bodies are different, and some are more tolerant of long drives than others, but, just like I was also told during my initial rehab stay, ALWAYS check your skin and be careful. The few extra minutes a day that we spend doing this is time well spent!
And, in case you need a refresher on weight shifts, click here to see our famous Doin’ Da Butt video.
I want to hear from you! Any other tips for long roads when you’re a wheelchair user?
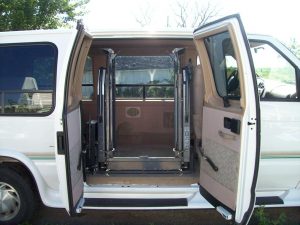
ROADSIDE ASSISTANCE: WHAT TO DO IF YOUR ACCESSIBLE VAN BREAKS DOWN
Car trouble is always problematic, but it’s even more complicated for people with disabilities. It’s stressful enough finding a tow for your vehicle, and twice as stressful finding accessible transportation to rescue yourself! A member of our SCI email network recently wrote to the group asking for advice on this matter, and fellow members replied with a wealth of practical tips and resources. Here are their recommendations:
Develop a “buddy system” with a friend (or even a few friends) in your area who have similar transportation needs. Exchange cell numbers and agree to help each other out if you get stuck.
Get to know your local para-transit companies and register with them in advance. Explain to them your situation and what might occur down the road. It’s possible they can help you out of a jam without advance notice.
Check out these accessible roadside assistance services. They operate similarly to AAA and provide comparable vehicle benefits but also include transport for an individual in a wheelchair and emergency assistance for a scooter/power wheelchair should it break down, depending on the plan you choose.
- ProtectionWorks™ Roadside Assistance, 877-275-4907
- ADA Roadside Assistance, 800-720-3132
As a last resort, keep the numbers of your local medical transportation companies with you at all times. You might have to pay $50 to $100 dollars for an emergency ride. One member totaled their van 20 miles from home, and they were transported in a lift-equipped van with no advance notice. They said their $90 bill was well worth getting off the highway quickly and home safely.
Also, depending on where you live, accessible Uber or Freedom Taxi may be an option. As a person with a disability, it’s important to have a back-up plan (and a back-up plan for that back-up, if possible!) for everything you do. Hopefully, you will never need to use them, but it’s always better to be safe than sorry. Enjoy the open road!

RUNNING ON EMPTY: GAS STATIONS & ACCESSIBILITY
We all know that just because a business says it’s accessible doesn’t mean it always is. One of the biggest perpetrators of this? Gas stations.
Congresswoman Tammy Duckworth (D-IL) has teamed up with the United Spinal Association and the Disability Gas Coalition to change that. The two organizations are advocating for refueling assistance at the pump for people living with disabilities. They just released a video interview with Rep. Duckworth, who is a double amputee and wheelchair user, about her experiences at the gas station.
In the video, she explains how she must park pretty far from the pump in order to use her ramp — so far, in fact, that she then can’t reach the gas tank. She also explains some of the dangers associated with the process, noting her ramp has been hit by other cars. On several occasions, she has had to resort to honking the horn or flashing lights in loud and crowded gas stations just to get assistance.
Here’s the crazy thing: the Americans with Disabilities Act already requires refueling assistance at the pumps when there is more than one employee on duty — but it rarely happens. The issue is that gas stations are often uninformed about this requirement and fail to provide refueling assistance for drivers with disabilities at the pump. The result? A major loss of independence.
“We must do better,” says Rep. Duckworth. “The ability to drive independently is key to the American lifestyle. Ensuring that disabled Americans can consistently and safely refuel their vehicles is critical to their ability to live independent and fulfilling lives.”
Click here to watch the video interview with Rep. Duckworth. You can also get involved! The Disability Gas Coalition is asking individuals to tweet gas station accessibility issues and tag @disabilitygasco. You can also join the Disability Gas Coalition Facebook group and share photos of ineffective signage or videos that document the struggle to get gas.
____
Train Travel

So much has changed in recent years to make it easier for those with disabilities to travel. Public transportation, from buses to airplanes and even trains, are constantly working at making travel easy and accessible to all. If you require the assistance of a wheelchair in order to be mobile, you can still use a train to get from here to there. These tips and tricks will help make traveling on a train with a wheelchair simpler.
Bringing your wheelchair onto the train. Trains around the world are designed to accommodate manual and power wheelchairs. Due to the gaps between the train and the platform, bridge plates are required to allow a wheelchair onto the train.
Requesting boarding assistance. Purchasing tickets at least 24-hours in advance will ensure you get the seating you require.
- If you’re traveling domestically within the U.S., inquire with Amtrak about assistance when you book. A 15% discount is offered to those passengers requesting a wheelchair seating space.
- If you’re traveling internationally outside of the U.S., it is often easier to purchase tickets directly at the station, as there are no single rail operators. Ticket agents will be able to guide you through the process of purchasing a handicap ticket, depending on which country you’re traveling in.
Arriving on time. An early arrival is paramount for passengers with disabilities. Doing so ensures that you receive the help you need when boarding the train or making your way to your seat. To prevent a delay, it’s important to connect with the information desk as soon as you arrive so that you know where to be on the platform when the train arrives.
Situating your wheelchair on the train. Trains around the world are equipped with removable rows or seats so that wheelchairs can be strapped in their place. Often, wheelchair users can situate themselves in a standard seat and park their wheelchair next to them for comfort.
Keeping your brakes on. When you’re on the train, ensure your wheelchair’s brakes are in use whether you’re in your chair or you have it sitting next to you. The floors of the train may be slip-resistant, but your wheelchair can still slide around while the train is in motion or breaking for a stop.
Finding help. Generally speaking, public transportation staff are ready and willing to help make your journey easier. Assistance comes in many forms, whether it’s helping you to the right platform or situating you safely in a seat. Never be afraid to ask for help!
Amtrak provides specialty services for passengers travelling with special needs. Accessible seating and restrooms are available in at least one Coach car on all Amtrak trains. Most lounge and cafe cars are wheelchair accessible. To obtain wheelchair accessible seating on an Amtrak train, it’s important to make a reservation early. For more information on travelling with Amtrak, visit their Accessible Trip Planning page here.
________________________________________________________________________________
WHEELCHAIR SAFETY & MAINTENANCE TIPS
____
When to Get a New Wheelchair
TIME FOR A NEW WHEELCHAIR? PART I
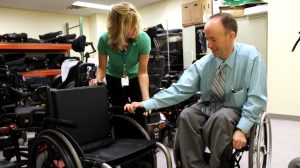
Of all the questions I get asked on a regular basis, none is more frequent than, “When is it time for me to get a new wheelchair?” The answer to this question is not so simple. There are several factors to consider, including:
- How long you have had your current chair and its condition. Unfortunately, there’s no set time frame. For example, I have changed chairs after only 4 years, and just spent 7 ½ years in my last chair. But in each case, I knew when it was time when I needed to make small repairs, deal with noises or other issues, and stopped feeling safe. Recently, my 7 1/2 year old chair was starting to feel that way. I was pretty sure it was time, but you always want a second opinion. Thankfully, Magee has a dedicated team to help assess our patients and anyone in the community who needs help determining when it is time for a new chair. The Seating Clinic is staffed by therapists who specialize in mobility and seating, and they have lots of experience working with people with various mobility impairments, as well as wheelchair manufacturers and vendors. I met with them, made my case, showed them my chair, and they agreed – it was time.
- Insurance coverage. I contacted my insurance company and presented the case for a new chair. I was given the OK to start looking, and that was when the fun began – and that’s where it begins for you, too. There are tons, I mean TONS, of different kinds of chairs out there. It can be hard to know where to start. My favorite site is Sportaid.com. This site allows you to really see what all of the current chairs look like. You can read about them, and compare different manufacturers and specifications. Once you drill down on the things you like, then you could also read feedback and reviews of the chairs you’re interested in.
After some serious research, I had narrowed it down to a few chairs. But getting a new wheelchair isn’t as simple as buying something on Amazon. Just because it looks good on the computer screen doesn’t mean it’s right for me, so I made an appointment with Magee’s Seating Clinic. Getting a new wheelchair can be stressful, and they help make it easier. You can make an appointment with our Seating Clinic by calling (215) 218-3900. If you are not from the Philly area, then I would encourage you to contact your local rehabilitation hospital and ask to speak to a seating specialist. They will be a huge help.
Okay, so you’ve decided it’s time for a new chair and have picked out a few you like. You’ve made your appointment with the Magee Seating Clinic or your local seating specialist, and… now what? Tomorrow’s post will take you through your appointment with your seating specialist and what happens next.
TIME FOR A NEW WHEELCHAIR? PART II
This is Part II of a two part series on purchasing a new wheelchair.
After doing research and choosing things that I thought I’d like in a chair, now it was time to meet with someone who is trained in seating and mobility. Just like when I was in therapy after my initial injury, we needed to work together and trust one another.
I had chosen two chairs that “looked” interesting to me… and by that I mean looked cool, but also had some features that I thought would meet my needs. We were able to talk about what I do on a daily basis, how much time I spend in my chair, the things I liked about my current chair, and the things I did not like about it. We also looked at the fit to decide if we would go with the same measurements, or make some changes.
I ultimately decided on a Ti Lite TR3. I liked that it could be custom made with a tapered front and was very light weight. I also felt it would meet my needs and be safe for me in all I do as an active wheeler. Thankfully, so did the therapist who helped me!
But remember what I said about how getting a new wheelchair isn’t like buying something off of Amazon? Well, it’s not. After agreeing on the chair, we still had a lot of work to do, like taking series of measurements, choosing options like the color (I chose a very cool black!), and other features, like the type of back, type of wheels and casters, and other things that would help me get to where I need to go safely. We then passed these measurements on to the manufacturer and who created a CAD drawing so I could be sure that everything I wanted could be made in the sizes I wanted before they began to make the chair.
In my case, it took two drawing to be sure everything was right, and then the chair proceeded to manufacturing. The time to receive your new chair varies, but in my case, it went out for shipping just two weeks after I placed the order. In most cases, the chair comes almost complete and ready to go right out of the box. My therapist checked it out to make sure the measurements were right, put the wheels on, tightened the breaks, and then was as excited as I was to see me in it.
But her job was not done just yet. We went outside and tried lots of things I need to do, like go up and down ramps and curbs, reach to the ground to pick something up while making sure I was safe and balanced properly, and transfer in and out of it safely.
After all of that was done successfully, there was one last step to be done, and that was for me to be pressure mapped. This should be done any time your seating position, cushion or chair changes, and only takes about 10 minutes to do. Our therapists at Magee can help with this, or the same person who helped you decide it was time for a new chair should be able to help.
Checking my skin for the first several days was important for me to do to since lots of angles and pressure points were different. Thankfully, all of these things worked perfectly, and I am now enjoying my brand new chair.
If you take anything away from this, know that getting a new chair is not something that should be done alone. Knowing I had the therapists and Seating Clinic at Magee to help me make sure I made the right decision was incredibly comforting to me. Getting a new wheelchair is truly a team effort – and when you’re cruising in a comfortable, safe and functional chair made just for you, you’ll be glad you had that team behind you!
____
Being a Good DME Consumer

THE PATIENT’S GUIDE TO BEING A GOOD DME CONSUMER
If you’ve ever needed to order durable medical equipment (DME) to use at home, you know how frustrating it can be trying to figure out what you insurance company covers vs. what they don’t cover. Or maybe you’ve wondered why it takes so long for a new wheelchair to be delivered. There is a lot to know about ordering DME so we’ve compiled a list of tips in order to help you be a good DME consumer.
What Is vs. What Is Not Covered
- In general, shower chairs are never covered by insurance companies. This includes roll-in shower chairs.
- Wheelchair ramps and stairglides for the home are also not covered by insurance companies.
- Insurance companies will typically cover only one mobility aid at a time, meaning if you need a manual wheelchair, they won’t pay for your rolling walker. Or if you need a prosthetic leg, they won’t pay for your wheelchair. It’s important you request your insurance company pay for the most expensive mobility aid so as to avoid having to shell out more money for any additional aids.
- Insurance companies will usually pay for new DME every five years, unless there is a significant change in functional status or weight. This is not a guarantee though for items like wheelchairs, if appropriate modifications can be made to the wheelchair without having to order an entirely new one.
Differences in Purchasing and Renting
- Bathroom DME like commodes and shower chairs are always purchased, not rented. My guess is not many people want to rent a used commode…
- Hospital beds and some manual wheelchairs can be rented for a period of up to 13 months. If you end up keeping them for 13 months or more, you own them. By that point, the insurance company has paid enough in rental fees to purchase the item from the vendor.
- Rental hospital beds are semi-electric, meaning the head of the bed is electric but the height of the bed is changed by using a manual crank. They also do not come with sheets. Lastly, the hospital beds insurance companies will cover are unfortunately not as nice as the ones we have for our patients at Magee. I try to share this with my patients before going home so it’s not such a shock to them when theirs doesn’t look like ours.
- Insurance companies will only cover a pressure reducing mattress (also known as a group 2 mattress) if a patient has a wound present at the time of discharge from the hospital.
Wheelchairs
- When a new permanent wheelchair is being ordered it typically takes 2-4 months (can be longer though) before the permanent wheelchair is delivered. It usually takes that long for your insurance company to authorize the wheelchair and for the manufacturer to build a customized chair. The good thing to know is that you will go home with a loaner wheelchair in the meantime.
- When ordering a power wheelchair (PWC), you typically go home with a manual wheelchair until your permanent PWC is finished being built. This is because vendors generally do not have PWCs available to loan to the pt.
- Some insurance companies require a home assessment or drive-by of the patient’s home to be completed by the vendor to ensure the entry way is accessible before they will authorize the purchase of a new PWC.
Paying for DME
- Always be sure to ask your case manager or DME vendor about any insurance co-pays before your DME is delivered so you don’t get sticker shock.
- Keep an eye out for organizations that loan out DME for free to patients with specific diagnoses. The ALS Association and Muscular Dystrophy Association of the Philadelphia area are two such organizations.
- Help Hope Live, Indegogo, and Go Fund Me are good options to help you raise money to fund DME not covered by insurance. Just know that putting money from a fundraiser in your own bank account can impact your Medicaid eligibility, if applicable. Help Hope Live is a non-profit that manages the money for you; therefore, your Medicaid eligibility will not be impacted.
- For the items that aren’t covered like showers chairs, Amazon.com and Walmart are great places to buy them at a seriously reduced cost.
____
Preventing Pressure Ulcers

5 EASY WAYS TO PREVENT PRESSURE ULCERS
If you’re a loyal believe@Magee reader, you have heard us talk about skin care… a lot. That’s because it is incredibly important! Today is World Wide Pressure Ulcer Prevention Day, which gives us yet another reason to promote proper skin care. A pressure ulcer is an injury to the skin and underlying tissue that occurs when prolonged pressure is placed on the area. It’s most likely to develop on skin that covers bony areas of the body, including the hips and buttocks, putting wheelchair users at increased risk.
Pressure ulcers can happen fast… and they can really set you back. But they good news is they are totally preventable! Here are 5 easy ways wheelchair users can prevent pressure ulcers.
- HYDRATE. Water is critical to keeping the skin healthy. Minimize the use of alcohol.
- LOOK. Visually check your skin twice every day to make sure there are no problems. When redness is seen on the surface of the skin, check for blanching, remove pressure from the area, and monitor the area for changes. Use a skin inspection mirror to see all areas
- PROTECT. Using the proper seating equipment distributes pressure evenly. Choose a good bed support surface. Use skin moisturizers. Manage incontinence.
- EAT HEALTHY. Protein is the most important nutritional food group for wound healing. Maintain a healthy body weight. Consider nutritional supplements
- DON’T SMOKE. It constricts blood vessels and reduces blood flow to your body tissues. It also increased the risk for burns.
Develop good daily habits and reliable regular routines. Protect your skin and focus on staying healthy for the rest of your life! And if you need a weight shift refresher, check out the video below. Funny? Yes. Informative? Absolutely!
________________________________________________________________________________
WHEELCHAIR PROM TIPS
____
Picking Out the Perfect Wheelchair Fashion

It’s that time of year again—prom season is upon us! To celebrate this momentous occasion, we’ll be sharing our best tips and tricks for an adaptive prom.
Now, when it comes to prom, question number one is probably, “Who am I going to go with?” But inevitably, especially for us girls, the second question is most definitely, “WHAT AM I GOING TO WEAR?” Picking out a dress for prom can be a daunting task in itself, but going shopping for a dress in a wheelchair can seem even scarier. Here are some tips and tricks to make your experience the best it can be.
- Call ahead. You should call a store ahead of time to let them know you are coming in a wheelchair to try items on. If you alert the store ahead of time, they may be able to spare an associate to help you throughout the time you are at the store. Also, they will be able to give you an idea of how accessible the dressing rooms are.
- Look into alterations. There are plenty of DIY alterations that you can have someone help you with after you purchase a piece of clothing, such as replacing fasteners or zippers, or altering a hem to prevent it from getting caught in wheelchair wheels.
- Don’t forget the details. Dresses that have too much fabric are also prone to get caught in wheels, brakes, etc. A two piece dress or a dress with an empire waist will allow you to look slim up top and show off your figure without swallowing you up in the fabric of your skirt.
- Take somebody with you. This will make it easier to obtain items, fuss with buttons and zippers, and get an honest opinion of how something looks.
- Order dresses online. This gives you the same ability to try things on at home. You can always send dresses back that do not work for you.
- Have fun! Don’t let the stress of finding the perfect dress ruin your overall experience! Make sure you leave plenty of time to find everything you need and make the necessary alterations. In the end, you will be less worried about what you’re wearing, and focusing on having a good time!
____
Adaptive Make-Up Application

Prom week continues! After you’ve picked out that perfect dress, it’s time to think about make-up. When you have decreased hand function due to an illness or injury, this is easier said than done. Some people go to a salon to get their make-up done for prom, but that can get costly on top of everything else you’ve paid for already.
To help you get ready for this oh-so-fun evening without breaking the bank on a stylist, we have pulled together some of our favorite adaptive make-up application tips:
- Use brushes with long handles that you can hold between your thumb and first finger.
- Place a small rubber band around the handle of the brush to keep it from slipping.
- Buy products that have larger wands/packaging to make it easier to grip in your hands.
- Buy products in “liquid form,” such as eyeliner and lipstick. These products will glide on easier with less pressure applied. Pencils and standard lipsticks tend to require more pressure to go on evenly.
- Use your teeth! Many times it is the easiest way to get things open.
- If you are currently still in outpatient therapy, you may be able to have your therapist make you a special splint to use with your specific make-up.
For even more tips and tricks, there are tons of great resources on the Web. We are big fans of BeautyAbility.com, run by Tiffiny, a 23-year-old C6 quad who knows her style. If you’re more of a visual learner, there are some amazing adaptive make-up application demos on YouTube. Our favorites are from Crystal, a C6/C7 quad with some serious skills. Check out her videos here, and her YouTube channel for even more great demos.
____
Hitting the Dance Floor in a Wheelchair

Whether you are in a wheelchair, or you are going to prom with someone who is, you probably have some questions about dancing. This doesn’t have to be the intimidating task you might be picturing. If you’re in a wheelchair and haven’t danced at a formal event before, it may be a good idea to check YouTube or some other sites for videos of other people dancing in their chairs, whether it is a powered wheelchair or a manual wheelchair.
Here are some tips to make the most of your big night:
- Safety first! Make sure you have your anti-tippers down, and move armrests and other parts of the chair out of the way to prevent you from falling, or preventing your date from tripping.
- Practice! You may be able to practice ahead of time with your date, a friend, your parents, therapist, whoever! You can incorporate twirls, spins and holding hands into your “routine” more easily if you’ve done it a few times before the big day.
- Think about whether you are going to move your chair, or just dance in your chair. You can utilize any movement you have to move along to the beat—there is no right way to get down.
- If you have one and are able, bring your mechanical stander. This will give you the chance to dance a few dances while you are “standing up.”
- Smile! Facial expressions are also a huge part of dancing. If you look like you’re having fun, no one is going to worry about “how” you’re dancing!
Want some inspiration? We picked out a few of our favorite videos, embedded below. If you want even more, check out these sites:
- American DanceWheels Foundation
- DanceAbility International
- Wheelchair Dancers Organization
- Axis Dance Company
Over the past few days, we’ve talked about picking out that perfect wheelchair fashion, adaptive ways to do your own make-up, and the oh-so many ways to tear up the dance floor in a wheelchair. Now that it’s time for the big day, we wish you all a very fun and safe prom!
If you take a close look in this video, you can see former patient Frankie LaMacchia getting down with the Push Girls!